 Isaiminia World Breaking News & Top Stories
Key Takeaways
- Plan cleanup before the first branch, root ball, or load of soil is removed.
- Separate materials at the worksite to avoid sorting the same pile twice.
- Use a central collection zone to reduce unnecessary trips across the property.
- Match carts, tarps, hand tools, and equipment to the material and terrain.
- Confirm disposal requirements before loading a truck or trailer.
- Finish with a detailed safety and drainage sweep.
Large landscaping projects can leave behind more than a finished lawn or planting bed. Branches, sod, soil, broken edging, mulch, packaging, and old hardscape materials can quickly turn into a disorganized cleanup problem. A simple system, including a durable landscaping debris tarp, helps contain material while protecting areas that are already complete.
The most efficient cleanup process begins before demolition, trimming, excavation, or installation starts. By mapping travel paths, assigning collection areas, and deciding where each material will go, homeowners and crews can spend less time dragging piles around the property and more time completing the work safely.
Why Cleanup Planning Matters
Cleanup can take longer than expected because debris is created in several forms at once. For example, removing an overgrown shrub bed may produce brush, roots, soil, old mulch, landscape fabric, plastic pots, and damaged border materials. If everything is dropped wherever it lands, workers must repeatedly walk, lift, sort, and reload the same material.
Planning also protects finished areas. A designated route for wheelbarrows and carts reduces the chance of rutting a lawn, scraping a patio, or tracking soil onto a driveway. Disposal capacity can also be limited. In Jefferson City, Missouri, hauling costs and staffing demands contributed to a change in how the city operated its yard-waste service, illustrating why it is wise to confirm local options before a major project begins.
Assess the Site Before Work Begins
Walk the property before debris starts to accumulate. Look for narrow gates, slopes, steps, soft ground, low branches, and corners that limit access. Identify finished surfaces that need protection, then determine where a truck, trailer, cart, or wheelbarrow can travel without creating damage.
Simple Pre-Work Checklist
- Where will each debris type be collected?
- Which route leads safely to the loading point?
- Can usable mulch, stone, plants, or pavers be saved?
- Which drains, irrigation heads, utility covers, and access points must stay clear?
- Could rain, wind, or saturated soil delay hauling?
Sort Debris Into Clear Categories
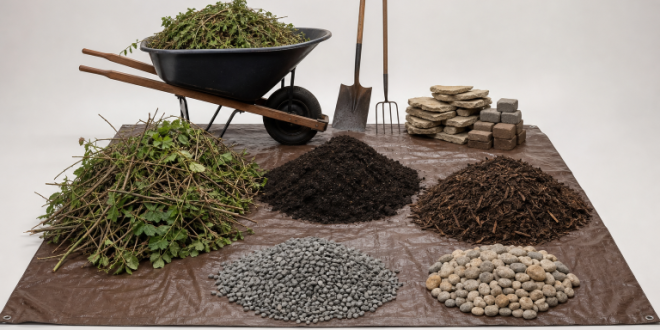
Mixed piles create avoidable work. Keep materials separate from the beginning by using marked tarps, bins, bags, or distinct pile locations. This makes it easier to reuse material and prevents a load of clean yard waste from being rejected for containing lumber, plastic, or rubble.
- Organic material: Leaves, brush, branches, grass, roots, and trimmings.
- Soil-based material: Sod, soil, clay, sand, gravel, and old mulch.
- Hardscape waste: Concrete, brick, stone, pavers, and edging.
- Construction waste: Lumber, metal, packaging, fabric, and plastic.
- Unrelated trash: Household items or discarded materials uncovered during the project.
Create a Central Collection Zone
Choose a level collection zone near the driveway, trailer, or loading area. Keep it clear of storm drains and away from open water. If wet soil, mulch, or fine debris may stain or compact the ground, place a protective barrier beneath it. Leave enough room for people and equipment to move around the pile without stepping on sorted materials.
Choose Tools That Reduce Extra Handling
The right tool depends on the load. Rakes work well around planting beds and lawn edges, while blowers are better suited to dry leaves on hard surfaces. Wheelbarrows and garden carts help with short-distance transport, and hand trucks can move compact bags, pavers, or boxed supplies. Chippers may reduce branch volume when on-site processing is practical. Tarps are especially useful for gathering loose debris into manageable loads without bending for every handful.
Work in Manageable Sections
Rather than letting debris spread across the entire property, finish cleanup in one zone before starting the next. Begin with large pieces, then remove medium-sized material, then rake or blow smaller fragments toward the collection area. Inspect each completed section before workers and equipment move on.
- Clear driveways and access paths first.
- Move through large planting beds and lawn areas.
- Finish fence lines, property edges, patios, walkways, and drainage points.
Handle Heavy and Awkward Materials Safely
Wet sod, root balls, stone, compacted soil, and long branches can shift unexpectedly. Cut branches into shorter sections when safe to do so, keep cart loads low and balanced, and avoid overfilling bags or tarps. Use team lifting for bulky pieces that cannot be safely divided, and use mechanical help when weight, distance, or terrain make manual handling unsafe.
Planning matters even more when the volume of debris rises quickly. After Hurricane Helene, more than 9 million cubic yards of debris were removed in North Carolina during the following year, according to the U.S. Government Accountability Office. Residential projects are far smaller, but the same principle applies: early staging and removal plans prevent piles from becoming harder to manage.
Plan Disposal Before Loading Begins
Contact the intended disposal site before work begins and ask what it accepts, whether fees apply, and whether branches must meet size limits. Keep organic material separate from soil, rock, concrete, lumber, metal, and household trash when required. Composting, chipping, mulch reuse, recycling, and donation can reduce the amount that must be hauled away, but only if the material is clean and appropriate for that use.
Complete a Final Property Sweep
Walk the property from multiple directions when the cleanup is complete. Check lawns, beds, fence lines, pavement, and areas beside structures for nails, wire, sharp branches, loose stones, plastic, exposed roots, or hidden debris. Clear drains and walkways, repair ruts where possible, and take finished photos if the project requires records.
Common Questions About Landscaping Cleanup
What should be removed first?
Start with large, heavy, or hazardous material. Removing it first opens access routes and reduces the risks of tripping and handling.
Should yard waste and construction waste be mixed?
No. Keeping them separate generally makes reuse, recycling, hauling, and disposal simpler.
When is extra help worthwhile?
Additional labor or hauling support can be useful for steep terrain, heavy soil, large tree sections, extensive hardscape debris, limited access, or a short completion deadline.
Conclusion
Efficient landscaping cleanup is built into the project from the start. A clear site assessment, an organized sorting system, a protected collection zone, a safe hauling plan, and a final sweep reduce wasted effort while helping the finished property stay clean and intact.