 Isaiminia World Breaking News & Top Stories
Key Takeaways
- Document existing parts with photos, measurements, and model details before ordering replacements.
- Verify dimensions, threads, materials, and system compatibility.
- Consider corrosion resistance and galvanic corrosion when selecting marine hardware.
- Consult a qualified marine technician for safety-critical components.
- Keep updated parts records to simplify future yacht maintenance.
Replacing a fitting on an older Taiwan-built yacht is rarely as simple as ordering the part that looks closest online. Many vessels have changed hands, received upgrades, or had original equipment replaced over decades of use. In Newport Beach, California, where yachts are exposed to salt air, marina moisture, sun, and regular movement at the dock, a small mismatch can lead to a leak, corrosion, or an inconvenient repeat repair.
Start with identification instead of guesswork. For owners, captains, and service teams comparing replacement hardware for Taiwanese built yachts, MMI Marine provides a marine-parts catalog and support resource from Newport Beach for yacht owners and dealers. Its connection to Taiwan yacht supply needs and its broad range of marine hardware make it a useful point of reference when an older component is discontinued, unmarked, or difficult to identify.
Why Part Matching Requires More Than a Quick Search
Taiwan-built yachts include a wide range of sailboats, trawlers, motor yachts, and pilothouse designs. Builders and prior owners may have sourced equipment from different countries, so a fitting can use metric threads, imperial threads, unusual mounting centers, or a brand name that is no longer active. Two parts may appear identical in a listing photo yet differ in depth, voltage, hose diameter, load capacity, or fastener pattern.
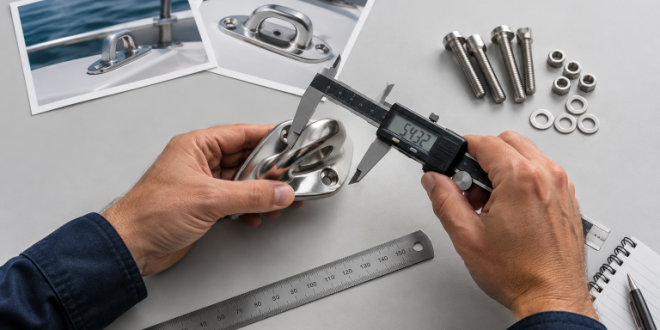
Before removing anything, photograph the part in place from several angles. Capture nearby hoses, wires, backing plates, labels, and surrounding surfaces. These details can reveal whether a component is original, whether an adapter was used, and whether there is enough clearance for a modern replacement.
Step One: Build a Basic Equipment Record
A short equipment record saves time when speaking with a supplier, surveyor, or marine technician. Store the information in a digital folder that can be updated after every repair.
- Yacht builder, model, and approximate build year
- Hull identification number, if available
- Location and purpose of the part
- Manufacturer name, model number, stamps, and casting marks
- Clear photographs of the installed and removed component
- Measurements, thread details, wire labels, and hose markings
- Notes about prior repairs, leaks, corrosion, or modifications
Keep the old component until the replacement has been dry-fitted and tested. Even a damaged part can provide important evidence about mounting geometry, clearances, and the correct orientation.
Step Two: Measure Before Ordering
Measurements are often more dependable than product names. A compatible replacement may be sold under a different brand, but it still has to fit the yacht safely and without forcing changes that create new problems.
Measurements to Capture
- Overall length, width, height, and mounting depth
- Center-to-center distance between mounting holes
- Fastener diameter, thread type, and thread pitch
- Hose inside diameter and fitting outside diameter
- Wire gauge, terminal style, voltage, and polarity
- Clearance for hatches, doors, engine covers, or cabinetry
- Expected working load for cleats, hinges, rails, or latches
A digital caliper is helpful for small fittings and threads. Use a tape measure for larger hardware, and photograph the item beside a ruler when sending details to a supplier. Measure the actual mounting surface, not only the removed part, because old hardware can distort, wear down, or conceal oversized holes beneath trim.
Step Three: Choose Materials With Corrosion in Mind
Marine hardware must tolerate moisture, salt residue, vibration, ultraviolet exposure, and changing temperatures. Stainless steel, bronze, brass, aluminum, plastic, and composite materials all have appropriate uses, but they are not interchangeable. “Stainless” alone does not identify a specific alloy or guarantee that a fitting is suitable for every location aboard.
Mixing dissimilar metals can cause galvanic corrosion when they are electrically connected and exposed to a conductive electrolyte, such as seawater. The principles behind galvanic corrosion in marine environments are especially relevant around aluminum frames, stainless fasteners, bronze underwater fittings, and shore-power-connected boats. Use suitable isolation materials, compatible fasteners, bedding compounds, and washers where the installation requires them.
When hardware is removed, inspect the surrounding fiberglass, wood, aluminum, or backing structure. Brown staining, loose fasteners, soft core material, cracked sealant, white oxidation, or moisture around a fitting can indicate that the replacement job needs to address more than the visible part.
Step Four: Separate Cosmetic Parts From Safety-Critical Parts
A cabinet pull and a seacock may both be small pieces of hardware, but the consequence of choosing the wrong replacement is very different. Treat each part according to its role in the vessel.
Lower-Risk Items
- Cabinet pulls and interior catches
- Decorative trim and non-structural hinges
- Interior door hardware
- Light-duty drawer slides and stops
Higher-Risk Items
- Through-hull fittings, seacocks, and drain hardware
- Fuel-system hoses, valves, and connections
- Steering components and load-bearing deck hardware
- Electrical circuit-protection devices and battery connections
- Engine-room fittings, exhaust-adjacent parts, and fire-safety equipment
- Grab rails, handholds, and boarding hardware
For systems that affect flooding prevention, fuel containment, steering, electrical protection, or passenger safety, match the original specifications where possible and consult a qualified marine technician when compatibility is uncertain. Owners can also review documented boat safety defects and recalls when investigating recurring equipment concerns on a vessel.
Step Five: Confirm Electrical and Plumbing Compatibility
A part can fit physically and still be wrong for the system. For electrical equipment, confirm voltage, amperage, polarity, terminal type, wire gauge, and circuit protection. For plumbing, verify the hose size, fitting thread, pressure rating, fluid compatibility, and temperature range. Do not assume a metric fitting will seal correctly in an imperial-threaded connection, even if it begins threading by hand.
For pumps, compare flow rate, connection size, mounting footprint, and duty requirements. Near engines, exhaust systems, or water heaters, check whether hoses, wiring, and seals are rated for the expected heat. Plan service access before final installation so filters, valves, clamps, and electrical terminals can be inspected later.
Questions to Ask Before Buying
- Does the replacement match the required dimensions and mounting pattern?
- Are the threads, hose sizes, terminals, and connectors compatible?
- Is the material appropriate for the installation location?
- Does it meet the necessary load, pressure, voltage, or temperature requirements?
- Will the job require new fasteners, adapters, hoses, seals, or backing plates?
- Can the supplier review photographs and measurements before the order is placed?
- Are the return terms clear if the component does not fit?
A Simple Installation Checklist
- Isolate electrical power, water flow, fuel flow, or other relevant systems.
- Photograph and label the original installation before disassembly.
- Carefully remove old sealant, corrosion, and damaged fasteners.
- Inspect the mounting surface, backing structure, and adjacent materials.
- Dry-fit the new part before applying sealant or tightening fasteners.
- Use appropriate bedding compound, fasteners, clamps, and isolation materials.
- Test for leaks, excess movement, overheating, vibration, and electrical faults.
- Record the new part number, source, installation date, and service notes.
Build a Better Parts Record for Future Maintenance
A well-organized parts file makes ownership easier, particularly for older yachts with mixed original and replacement equipment. Save photographs, receipts, measurements, manuals, wiring notes, hose specifications, and installation dates. Over time, that record becomes more useful than memory and reduces the chance that the same identification work must be repeated.
For Taiwan-built yachts maintained in Newport Beach and beyond, the most reliable replacement process begins with careful documentation. Measure accurately, select materials thoughtfully, verify system requirements, and treat safety-critical hardware with the level of caution it deserves. That approach helps protect the yacht, reduce downtime, and make every future repair more predictable.