 Isaiminia World Breaking News & Top Stories
If you’ve ever stood in front of a mirror wishing your lashes looked fuller, thicker, or simply more present, you’re far from alone. Sparse natural lashes are one of the most common cosmetic concerns, leaving many people feeling like no amount of mascara can truly deliver the dramatic, defined look they’re after. The frustration is real — and so is the solution.
DIY eyelash extensions have emerged as a game-changing, accessible alternative to expensive salon visits. Rather than booking appointments and spending a small fortune every few weeks, you can now achieve professional-looking results from the comfort of your own home. This guide is designed to walk you through exactly how to do that — safely, effectively, and with results tailored specifically to your lashes.
Beyond the obvious cost savings, the DIY approach offers something salons rarely provide: complete personalization. You control the length, curl, and placement, meaning you can target the exact gaps and thin spots that bother you most. Whether you’re a complete beginner or looking to refine your technique, this article covers everything from choosing the right materials to mastering application and long-term care for a fuller, more confident lash look.
Why DIY Eyelash Extensions Are Ideal for Sparse Natural Lashes
Sparse lashes present a unique set of challenges that go beyond simple aesthetics. When your natural lash line lacks density, mascara tends to clump the few lashes you have together rather than creating the impression of fullness. The result is a look that feels overdone yet still underwhelming — a frustrating paradox that many people know all too well. Thinly distributed lashes also make the eyes appear smaller and less defined, which no amount of liner or eyeshadow can fully compensate for.
This is precisely where DIY eyelash extensions shine. Unlike mascara or strip lashes, individual extensions are applied directly to your natural lashes, allowing you to place them exactly where your lash line needs the most support. Sparse patches along the inner or outer corners? You can target those specifically. Lashes that are short in the center but slightly longer at the edges? You can balance that out with deliberate placement. This level of precision simply isn’t possible with any other at-home lash product.
The key to making this work safely on sparse natural lashes is choosing lightweight fiber extensions. Heavier synthetic lashes can pull on delicate or fine natural lashes, causing stress at the root and potential breakage over time. Lightweight fibers — particularly those made from silk or faux mink — distribute the added weight more evenly, keeping your natural lashes protected while still delivering visible volume. When applied correctly with a quality adhesive, they create the convincing illusion of a fuller, denser lash line without looking artificial. The DIY method also puts you in complete control of the outcome, letting you build density gradually and adjust the look to suit your eye shape and personal style.
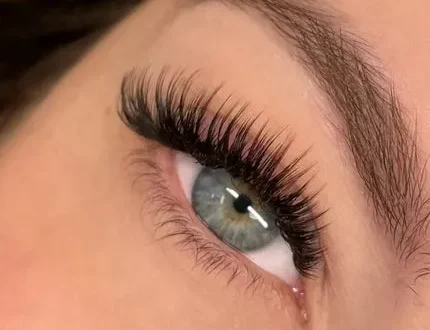
Choosing the Right Style: Classic and Beyond for Density
When it comes to building density on sparse lashes, the classic style extension is your most reliable starting point. Classic application means attaching one extension to one natural lash — a straightforward, one-to-one ratio that adds defined length and subtle fullness without overwhelming a delicate lash line. For anyone new to DIY extensions, this method is forgiving enough to practice without risking a heavy or overdone result. It’s also the cleanest way to fill in gaps, since each extension is placed intentionally rather than layered on top of existing volume.
You may have come across volume and hybrid styles, which use fans of multiple ultra-fine extensions per natural lash to create a fluffier, more dramatic effect. While these styles can look stunning, they’re generally better suited to lashes that already have reasonable density to support the added weight and complexity. On sparse lashes, attempting volume fans before mastering classic placement can lead to uneven results or unnecessary strain on fragile roots. Starting with classic gives you a solid foundation — and once you’re confident in your technique, you can incorporate a few volume fans in thicker sections for a hybrid effect that adds dimension without sacrificing comfort.
Selecting the right length and curl matters just as much as the style itself. For sparse lashes, a moderate length — typically 1 to 2 millimeters longer than your natural lash — looks believably full without appearing stiff or artificial. A C-curl is a versatile choice that lifts the eye naturally and suits most eye shapes, while a D-curl offers more drama if your natural lashes grow downward. Brands like SenseLashes offer extension trays in a range of curl types and lengths, making it easier to mix shorter extensions toward the inner corners and gradually longer ones toward the outer edges — a soft, lash-line-enhancing effect that reads as naturally dense rather than obviously augmented.
Step-by-Step Guide: Applying DIY Extensions to Sparse Lashes
Preparation and Tool Selection
Before touching a single lash, having the right tools assembled makes the difference between a smooth application and a frustrating one. You’ll need a pair of fine-tipped isolation tweezers and curved application tweezers, a lash tray with your chosen extensions, a quality low-fume adhesive formulated for sensitive use, a small adhesive ring or jade stone, a micro-brush or lint-free applicator, and a well-lit magnifying mirror. When selecting your adhesive, prioritize a lightweight, flexible formula that cures without becoming brittle — this is especially important for sparse lashes, where a stiff bond can stress fragile roots. Pair it with silk or faux mink fiber extensions, which are light enough to sit comfortably on fine natural lashes without causing tension or premature shedding.
The Detailed Application Technique
Start by thoroughly cleansing your lashes with an oil-free cleanser to remove any makeup, skin oils, or residue — even trace amounts of oil will compromise adhesive bonding. Allow your lashes to dry completely before proceeding.
Once prepped, dispense a small drop of adhesive onto your ring or stone and work quickly, as most lash glues have a short working window of 30 to 60 seconds before thickening. Using your isolation tweezers in your non-dominant hand, separate a single natural lash from its neighbors and hold it steady. With your application tweezers, pick up one extension from the tray, dip the base — roughly 1 to 2 millimeters — into the adhesive, and slide it onto the isolated natural lash about 1 millimeter from the skin. Press gently and hold for two to three seconds to allow initial bonding.
For sparse lashes specifically, focus your early placements on the most visible gaps rather than working uniformly across the lash line. The inner corners and center sections typically benefit most from targeted extensions. Avoid placing extensions on very short or weak lashes that lack the structure to support added weight. Work in sections — outer, center, then inner — and step back periodically to assess density and symmetry. Keep extensions from touching each other during application to prevent sticking and clumping.
Immediate Aftercare and Shaping
Once you’ve completed placement, resist the urge to touch or adjust your lashes for at least two hours. Most adhesives reach a functional cure within this window, but full bonding strength develops over 24 hours — during which you should keep lashes dry and avoid steam or humidity. After the initial drying period, use a clean spoolie brush to gently comb through your lashes from base to tip, separating any extensions that may have drifted slightly during curing. This step also helps blend extensions naturally with your remaining lashes for a seamless finish. If any placement feels uneven or a gap remains more visible than expected, a single well-placed extension can be added once the adhesive has fully set. Step back and assess your lash line in natural light to confirm the density looks balanced across both eyes before considering the application complete.
Maintaining Your Enhanced Lashes: Safety and Longevity
Getting your extensions on is only half the equation — how you care for them afterward determines both how long they last and how well your natural lashes hold up underneath. The most important daily habit is keeping your lashes clean using an oil-free, gentle cleanser. Oil-based products — including many makeup removers, moisturizers, and even some sunscreens — break down lash adhesive over time, causing premature shedding. Use a soft cleansing brush or your fingertips to work the cleanser through your lashes in a downward motion, then rinse carefully and pat dry. Aim to cleanse every one to two days to prevent buildup without over-wetting the bond.
Sleeping position has a surprisingly significant impact on extension longevity. Pressing your face into a pillow creates friction that loosens bonds and misshapes extensions overnight. Sleeping on your back is ideal, but if that’s not realistic, a silk pillowcase significantly reduces the friction compared to cotton. Avoid rubbing your eyes during the day as well — it’s one of the fastest ways to dislodge extensions from sparse lashes that may already have a lighter anchor point.
When it’s time to remove your extensions, never pull or pick at them. Instead, apply a small amount of oil-based remover or coconut oil along the lash line and allow it to soften the adhesive for several minutes before gently sliding extensions off with a clean spoolie. Forcing removal tears natural lashes at the root, which is especially damaging on an already sparse lash line. The most common mistakes to avoid overall are using too much adhesive during application, skipping the cleansing step, and applying extensions to lashes too weak to support them — all of which lead to clumping, irritation, or breakage. Staying consistent with gentle care keeps both your extensions and your natural lashes healthy for the long term.
Achieving Fuller Lashes on Your Own Terms
Sparse natural lashes no longer have to feel like a limitation you simply live with. As this guide has shown, DIY eyelash extensions offer a genuinely effective, customizable way to build the density and definition your lash line has been missing — without the recurring cost or scheduling constraints of salon appointments. The key is approaching the process thoughtfully rather than rushing toward dramatic results.
Two factors consistently make or break the outcome: your choice of materials and your application technique. Lightweight silk or faux mink fibers protect fragile natural lashes while still delivering visible fullness, and mastering the classic style before experimenting with volume ensures your foundation is solid. Targeted placement, proper adhesive use, and consistent aftercare are what separate a natural-looking, long-lasting result from one that feels uncomfortable or looks overdone.
The most encouraging part of this process is that it rewards practice. Your first application will teach you more about your own lash line than any tutorial can, and each attempt gets more precise and intuitive. Start conservatively, focus on your most visible gaps, and build from there. With the right tools — whether you’re sourcing individual components or working with a dedicated at-home system like SenseLashes — a little patience and the techniques outlined here make achieving a fuller, more confident lash look entirely on your own terms absolutely within reach. Your lashes are ready for the transformation.